Jack

Jack

Sunday, March 31, 2013

Happy Easter!

Bloop was only mildly wowed by the weird colored eggs.


He displayed much more horrified fascination with the light up, squishy rubber chick from the kid's basket. When shown a patently fake neon, two-tone iridescent plastic egg he immediately went into, 'An egg--! Ooh! By the way, look, I'm really good at finding cool places to nest!' mode. Silly rooboy.

Also, the Easter Bunny has a decidedly evil streak when it comes to coloring and hiding eggs:

Saturday, March 30, 2013

GO!

We're off!


A total of 40 eggs were started in our new ReptiPro 6000 incubator this morning, if all goes well they should hatch Saturday, April 20th. There are 15 that I got from a local family in a fertile hatching egg trade, these breeds include light Brahma, Golden Polish and some mixed breed Polish, Buttercup, Silver Laced Wyandotte and Leghorn birds.


The remaining 25 eggs are from our hens.


The gray stuff along the front of each rack is some weatherstripping to keep eggs from rolling out.

I'd tried to line the racks with wire, but it ended up holding too much heat and making the temps go haywire, so I removed it.

I got a new hygrometer, in the back, top left. The purple thing is the water weasel which holds the temp probe, it simulates what the temp is inside an egg which is what you want. Dud eggs will be removed as incuabtion progresses.

All of the eggs have been numbered and look good. The weird round tracing on the large end of the eggs are the outline of the air cell--I'm changing my incubating technique radically and in addition to turning the eggs by hand 5 times a day (I have no life for the next 18 days) and candling them on days 7, 14 and 18 to make sure that they are losing the proper amount of weight (which is moisture--13% over 21 days), and will trace the new outline of the air cells on the eggs at that time--it'll end up looking a bit like the rings of a cut section of tree trunk. In addition I'll be weighing each rack of eggs every 3-4 days to make sure they are losing the correct percentage of weight. Between weighing the eggs and candling, you get a very good indication of how the eggs are doing--if the air cell is looking too large, the humidity is too low, if it is to small, the humidity too high.

So the hatch SHOULD be Saturday, April 20th. But given past years, the little buggers may well be a bit early or late according to Mother Nature's whim. If you go to the UStream Chickam page and see EGGS, it means the hatch is on!

The plan is for the ReptiPro to hatch the chicks, which will then immediately be removed to our old forced air styrofoam incubator to dry out & get strong. I'm going to try and get at least one of our girls to go broody so that she can take over the chicks once they are in the brooder box.

We will be testing the cam for a few minutes a couple of days prior to hatch just to make sure everything's working. We may also put the cam out in the yard with the adult chickens, our back yard is nearing completion and we may be allowing the chickens out of the run and into it for the first time.

Wednesday, March 27, 2013

Marching Forward...

Rounding the far turn and entering the home stretch with the back yard! We're down to the last bank of juniper/cypress plants. This batch is harboring more big rocks than the others, and just as much trash. But be gone they eventually will be, although we're trying to salvage some of the cypress plants as cover for the chickens for now.


The ones on the left have been partially cleaned up and shaped. Today we found more rotting dog toys, several balls, a large yellow plastic dish and a child's sweatshirt, plus a metric ton of trash.

Also, I made a fertile egg trade with a local lady and got these lovelies!


I gave her some Belgian d'Uccle, Americauna, Giant Cochin, Brahma, Barred Rock and New Hampshire eggs. She has a mixed flock like ours, with Light Brahma and Golden Polish roos running with Sicilian Buttercup, Silver Laced Wyandotte, Rhode Island Red, Leghorn, Golden Polish, Light Brahma and Orpington hens. They go into the incubator along with our hen's eggs on Saturday!

Yay for more chickens with silly doodads on their heads!

Call 'Em As You See 'Em...

Finally, a feed store with the guts to call chickens what they REALLY are, VELOCIRAPTORS!:


Actually, it was a toy for the kid, but it still gave me a giggle since we've bought chicks from this place before.

Monday, March 25, 2013

Incubating High Tech Style, I'm DONE Dinkin' Around!

So the new ReptiPro 6000 incubator has arrived, and is being tested!


It has a blue interior light so it's gonna be kind of a baby chick rave:


The old styrofoam incubators just weren't cutting it up here, and the other day while being tested the forced air 'bator started to fluctuate temperature wildly.

That did it. Time to go high-tech.

So in doing days and days of online research and picking the brains of various fellow chicken owners, the ReptiPro was clearly the incubator of choice--actually a huge Sportsman cabinet model capable of hatching out several hundred eggs at a time was the way to go, but seeing as how those start at around $700 for the cheapo model, the ReptiPro was the saner choice. Having a small cabinet model like this takes our ambient humidity out of the equation, and this unit recovers after having the door opened to correct temp & humidity very quickly.

In testing my hygrometers I discovered that my fancy digital one was low by 22 points and even the el crappo dial one was low by 5 points. Neither can be adjusted, so we took ourselves off to the store and got a new digital hygrometer, which is being calibrated now.

Each shelf can comfortably hold 16 standard size eggs, although some people I know pile a LOT more eggs on and even stack them! I think for our first whack at hatching with this thing we'll go with 32 eggs to start, a mix of standard size and bantam eggs. I'm doing a fertile egg swap with another lady here in town so we hope to have some mixed breed Wyandottes, Buttercups and Polish chicks, too.

Incubating with this 'bator calls for me changing up my incubation technique pretty radically--running a drier incubation, turning eggs 5 times a day rather than 2, continuing to open the door 5x a day for ventilation right up to hatch--no 'lockdown'--and moving just-hatched chicks to the old styro incubators to dry out and get strong before they go into the brooder box. We'll remove chicks as they hatch so that they don't raise incubator humidity too much.

This is quite a departure for me, but what I used to do does NOT work up here, so I've gotta take a leap of faith and try this!

One of last year's chicks, a Red Star named Zipper, is thinking about going broody, but I don't know what kind of mama she'd be as a first-year hen. We'll see when April 20th rolls around if we have any volunteer mamas. Chickam should be interesting if all goes well...

Juniper Removal Blearily Continues...

I'm starting to think that this job, like painting the den, will never be done, despite me knowing for a fact that work is done on it every single day.

But at any rate, two juniper stumps are now out and one more is most of the way out, leaving one more after it in this area. After they are gone, this is where the pond, a drawf weeping maple and a big white rose bush will go, incorporating lots of the rocks from the back yard. The good news is I unearthed a sprinkler head near here today, so the water pipes are already in place.


The fun part of the half-dug-out stump in the foreground is that RIGHT next to it, in the area between the stump and shovel, is another huge wad of concrete and the remains of a 6x6 redwood post--just like the OTHER one we found the other day on the other side of the chain link, way over in front of the chicken run.

Neither of these two match up along the same lines, so whatever the Hell used to be here, these two posts & concrete are unconnected. Who the Hell plants a plant RIGHT next to an old concrete posthole?!

Which means we'll very, very likely find even more of these, like big crappy land mines.

Friday, March 22, 2013

Juniper Removal Continues, Now With More Tools!

So now the back yard is juniper free! Today was more branch hauling to the monsterously huge brush pile in the back of the property, which the local quail have decided is peachy keen and are living in. Guess clearing away the pile will wait until after baby quail season...


The trash lasagna plant by the back door is cleared except for it's stump, the remaining cypress plants may stay if we can get them under control and cleaned out. The cypresses got into the fun by yakking up another 6 foot metal fence post. The pointless tripping hazard of old bender board half frost-heaved from the ground was removed.


We even got the stump of the dead juniper pried out, thanks to a huge freakin' rock and a spare chain link post we found in the yard. Thanks Archimedes, yay for fulcrums/levers!


We're now trying to figure out where to logically put the fence to connect the chicken run and back yard, and plan ahead for future projects like the raised bed garden I want at the back of the property. I only want to place fence ONCE. On the plus side, the two metal fence posts the junipers & cypresses gifted us with can be resused for the new fence. I spent yesterday repairing holes in the chain link from the previous tenant's horses and moving cut branches, so my arms look like I thrust them into a bag of angry pumas. Today's weird trash yield included the cap for the chain link gate post, a screwdriver and a small sledgehammer in pretty fair condition, also a huge chunk of concrete that obviously held a 6x6 redwood post. This means either a gate or hitching post, which means sooner or later the other shoe will drop and we'll find a matching wad of concrete half-buried nearby. Next I expect the junipers to cough up a prison shiv and try to shank me.

Wednesday, March 20, 2013

Today's Freak-Out Courtesy Of My Kid

So the kid hit her dad up for a treat off the ice cream truck, which just happened to be trundling by when he brought her home from school.

It's got bubble gum eyes, oh, boy!

Everything was fine until she opened it, that's when she started doing that horrified shriek/uncontrollable laughing thing and ran in to show me...

Mutant Sonic, AAAGGGHHHH!

There seems to be a budding Picasso at the ice cream factory. Also, the damned thing stained my kid's face blue.

Thursday, March 14, 2013

Testing, Testing...

Since we're going to be setting eggs to incubate on March 30th to hatch for our annual Chickam web broadcast on April 20th, I'm test running the incubators.


The chosen spot is back on top of my massively heavy kitchen island, in the dining room. The table we had them on last year transferred too much vibration from the floor, making the eggs jiggle suggestively and leading to false hopes for those eggs to hatch. NOTHING moves this thing, which is also good since it eliminates the danger of bumping the table and knocking over eggs you've been incubating for weeks.

I've been doing hours and hours of research online, reading scientific studies on hatching at high altitudes and picking fellow chicken breeders' brains for tips--last year our hatch was miserable and weird--we either had chicks hatching out 2 days early or 2-3 days late, and many chicks that died at day 19-20--they'd turned into hatching position but never did the internal pip of piercing the air cell. They'd been rocking their egg but then just died. When I did the after-incubation breakout of the unhatched eggs it was heartbreaking, and knowing that those healthy chicks got that close to hatching was frustrating.

I have gained some new insight and this year, although we weren't able to build the homemade incubator we want and are still using the old styrofoam 'bators, we will be making some drastic changes to our technique--things that absolutely wouldn't work at sea level we're going to have faith in here at 5000 feet in a dry climate. The hatching of an egg is a remarkably complex and delicate procedure and everything has to go just right.

Lower air pressure and drier air mean that we have to increase both humidity and ventilation--ideally pumping in extra oxygen would help during the last three days of incubation, but that isn't an option right now. Since we had chicks hatch early, I'm going to go against all instincts and lower the overall incubation temperature just a hair to about 99 to 99.5 degrees--no higher--we need to cook 'em slower! Last year we also had an overnight temperature spike of 106 degrees on hatch day, reason unknown. Also, getting the incubator humidity up to 65% for the final three days is nearly impossible up here. All the equipment is getting a thorough testing and calibration check.

We'll also make some more ventilation holes in the lids and bases of the incubators and buy some cap plugs so we can increase/decrease ventilation as needed.

I'm also hoping that using only high altitude eggs will make a big difference--trying to hatch sea level eggs at altitude makes for a poor hatch rate and lots of dead-in-shell, near term chicks. Sea level eggshells have larger pores and exchange O2/CO2 at a much greater rate than high altitude, smaller-pored eggshells do.

I had what I thought was a wild idea--somehow seal sea level eggs partway to balance the larger pore problem, possibly using a super thin coat of wax, strategically painted on in spots. Turns out someone else already tried it, with limited success, and wrote a scientific paper on it. I'm still kicking it around in my head as an artificial 'bloom' coat for hatching eggs, maybe with some other substance...

Meanwhile the girls are getting tons of vitamins, Omega oils, fresh dark leafy greens, protein & calcium to get the best eggs possible from them--last year they had only been here a couple of weeks and some of their eggshells at breakout were thin. Now we're getting lovely, healthy, strong eggs; the girls are happy and relaxed and the boys are doing their job. Who knows, maybe one of the girls will go broody and we'll have a mama for Chickam!

With my luck it'll be one of the HUGE hens and I'll have to make the brooder box accomodate a plus-size hen.

Monday, March 11, 2013

Scratch one Bird-Eating Plant!

That big asshole juniper in the corner turned out to in fact be TWO plants, although one had horror-movie-worthy multiple trunks.

They are GONE.


Of course, there is a massive brush pile next to where they were, which makes my body hurt just to think about dragging away. I'm so bleary-eyed & bone-tired now, that I can barely remember my own name but the race is on to get the back yard sorted out before the local skunks come out of hibernation--and it's getting into the mid 60's-70's this week, so we HAVE to get this done, they love the damned junipers.


Here's a bit of the junk pulled from the quail-eating bastard juniper, most of it baling wire--buckets included, by the way:

Seriously, who throws shit like this in their own back yard for years?!

Onward to the final juniper plant, this tangled mess is right outside my back door. Charming.


It is SO very matted and full of trash that it's a trash lasagne at this point, you have to dig at the center to find branches to cut. I pulled a 4 foot section of 1x6 out of it today like some kind of low-rent magic trick. But it's the last actual juniper plant, the rest along the back of the house are cypress plants and MAY be suffered to live for now as cover for the chickens if we can get them decently cleaned out and given a military trim. I hate to leave the back yard bare since we have so many hawks, the chickens need some kind of cover until our trees and other bushes we planted grow.

Meanwhile, today we found the perfect representation of the previous tenants: From the 80's, a Bud Light can, a Pepsi can and a Yoo Hoo bottle. Plus assorted old tennis balls, a metric ton of generic trash & plastic...and one gardening glove.

If I find the owner of it I'm just gonna mulch him in, if the junipers haven't completely digested him.

Saturday, March 9, 2013

Now THIS Is Just Going TOO Far...

More Juniper Death today. Today the kid and I worked on clearing cut branches, and cutting back the grandfather of all these nasty assholes, the one on the far right.  Here it is last June, 'before':


Halfway through cutting it out:


You can see why these are such a damned headache--they've been growing willy-nilly and trapping trash for 40 years. Today it was about 9 miles of baling wire--which you never see, it just gets snarled instantly in the chainsaw, trying to remove your head at the neck. Also a large blue ball, a golf ball and a toy car, plus the usual 40 metric tons of run-of-the-mill trash.


Haha, stupid junipers, think a board with rusty nails is ANY kind of defense against a chainsaw?!

The pink 5 gallon bucket is something we pried out of one of the OTHER junipers the other day, today we found that granddaddy Cthulhu's big brother had RE-eaten it and it was mired deep within it. Good God.

Sadly, it had also eaten one of our Valley Quail, apparently yesterday--she was found dead, tangled in it's branches. That's the final straw...just another reason to hate the damned junipers and cleanse them from the Earth.

The other side of the yard slowly getting cleared. My wheelbarrow is under there somewhere...


The kid poses with ONE of the cut-out branches.


Since a bunch of the trash is little bits & pieces of plastic, metal, broken glass, etc. we are trying to get the yard as chicken safe as possible, which means picking through all this crap by hand and fussing out the trash. One thing I found while raking out gallons of plastic & trash was a HUGE nest of stink bugs. The kid ran and got a cup, and we filled it with yummy stink bugs for the chickens inside about 1 minute. We saw pretty quick that we'd have to bring in the big guns for this one.

This called for a specialist. Bear!


Bear ate some, but pretty clearly couldn't get past the taste. We brought Bloop in, but he was fascinated with courting Bear and ignored the bugs, silly rooboy. Once we get the yard done I'm sure that River and Zip will be glad to clear those suckers out, they LOVED them.

Monday, March 4, 2013

One Month To Paint ONE Room? Yes, Please!

Arg fargl, the den is done.

Of course, I still need to rip off the last of the blue painter's tape and install the doorknob...


Oh, and unpack all the books...


And the desk placement is temporary and nothing is on the walls but one clock...

And the windows need some kind of drapery...

Shit. I ain't done, am I?

Bleah. Meanwhile, juniper death marches on! Today's Juniper Mystery Trash Surprises: a softball, a dog toy, yellow rope and the Mt. Everest of trash...including a McDonald's styrofoam Chicken Nuggets container, which they quit using in 1990. Pretty bad when the junipers are eating fast food. No wonder they are so damned big, they bullied someone into feeding them.

Now with fun 'before' and 'after' shots!

Back yard before, last June-overgrown and nasty...we were just starting that day to hack away at the damned junipers:


And after!


The ones along this side of the back fence are gone! Gimanderous brush pile will be hauled away to the back part of the property, where the local wild quail are loving it.

Half of the junipers on this side are gone, the rest fall today. I did find an Ouroborosian growth in the base of the things--a huge branch that came up and then dove back down into the earth, ending who knows where. Presumably gone to visit his buddy Chthulu. I'll bet there's some guy in China ripping out junipers and cussing them. Also a board with rusty nails sticking out of it. Haha, stupid junipers, bringing a board-and-nails to a chainsaw fight...
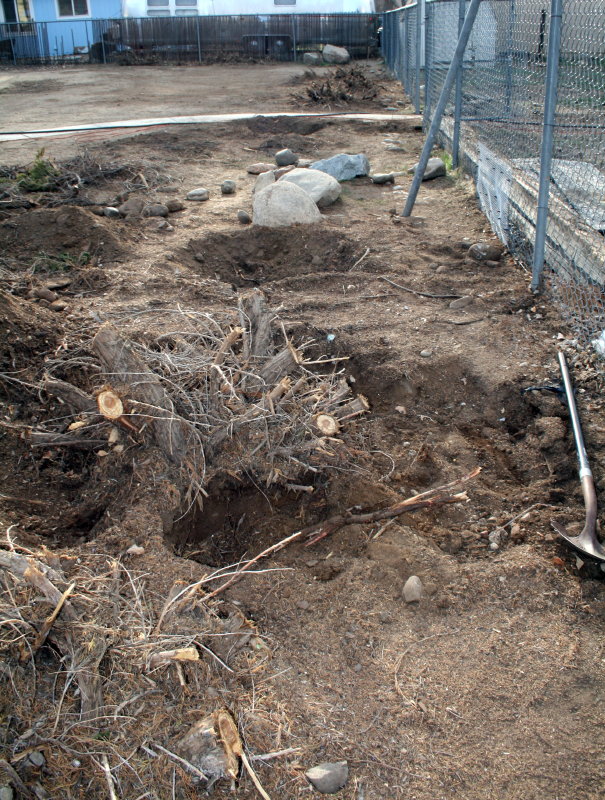
The giant rocks are awesome and will stay. Next to giant awesome rocks is a cutting from the Curly Willow plant that I brought from the old house, the one we had in the back yard there got massive, was gorgeous and made for great cover for the chickens, and was edible for them as well. Eventually the chickens will be able to roam this part of the yard, once I repair some holes in the chain link caused by the previous tenant's horses. It'll make the chickens so happy to be able to come up to the back of the house again!

Side fence before, the junipers had, needless to say, grown through the fence everywhere:


After! Well...partially. Just wresting them free of the fence and getting them to this point was a major accomplishment:

We trimmed these away from the fence first and discovered that when we did that, it exposed the vulnerable underbelly of the damn junipers and made it easy to attack them from the rear & chop 'em out. Yeah, baby!

Back fence before:


And after!

We're thinking of making the old water heater in the background into a doghouse for Dusty, cutting it up to resemble an old-time Saturn rocket and painting 'Dogstar 1' or something equally goofy on it. Next to the big rocks, where we took out the first juniper, I plan on installing a small pond. That big bastard in the background will be the next one to go after today. Nothing left along the back fence in the foreground but the plant bases and roots, yay!

...which I will now have to dig out.

To quote Scarlett O'Hara, 'I won't think about that today, I'll think about it tomorrow.'