Jack

Jack
Showing posts with label Home Improvement. Show all posts

Tuesday, August 6, 2019

A Good Time Thirty-Six Years In The Making!

So the old GE dishwasher that was here when we moved in seven years ago, has lately decided to allow icky water to sneak back into the machine. Icky water that would then build its very own, very special, stink. The fact that it wasn't doing it all the time, and would take a couple of days before your nose alerted you that something down there was VERY wrong, was just a muttered-swear-word-inducing bonus.

Okay, so off I go to the Internet, where surprisingly enough, I find a straightforward, well-made tutorial on how to repair a non-draining dishwasher, starring my exact machine! While this is handy, it also inspires dread--is my machine somehow famous for breakdowns...?

The video tells me that the part that allows the machine to drain is a 'flapper valve', located at the bottom of the sump--now, anything called a 'sump' cannot be a good thing in this scenario, and I am NOT looking forward to visiting it, much less sticking my finger down there to make sure it is working properly, as the video instructs. Doesn't matter tho, because I've gotta take that sucker apart and find out what's wrong.

No guts, no glory. I'm goin' in. Armed with several dishwasher-threatening tools, I remove the racks and arms--this part I've done before two years ago, taking the machine part-way apart to clean it. That's when I found all kinds of dog hair and broken glass lodged in the apray arms, which afterwards worked adequately...as could be expected in a 30+ year-old machine, I believed. I know, I know--what I really need to do is replace the machine, as it is old and inefficient. But since my washing machine, lawnmower and BOTH cars have recently ALL decided to die at the same time, it's just not in the budget right now.

I manage to get the upper spray arms out without breaking anything, and now it's time to delve into the guts of Dante's Dishwasher Inferno. The lower spray arm is first. This is what the bottom of my dishwasher is supposed to look like. In mine that big lower screen is metal, but otherwise identical--minus the gunk.

The lower spray arm...mind you, I've done the baking soda and vinegar thing several times since moving in, so everything you see from here on out is the cleanest I could get it until today. FAIR WARNING: this gets unutterably nasty, really fast.
There was this weird gray...fuzz on everything. Almost as if someone had stuffed a roll of paper towels in the dishwasher back in the misty dawn of time and hit 'Start'. For clarity's sake, let me just say that I am one of those people who washes their dishes BEFORE loading the dishwasher, I know this machine has no garbage disposal capability. I use the machine primarily to de-grease, sterilise and dry; and never load food-covered dishes in there.


Weird gray fuzz has attained...chunkiness. Removing it requires some old dental instruments I have and more muttered swears.

We've reached the first filter and the hub nut cover. Inexplicably, this filter is all one unit and cannot be taken apart to remove the gray chunkiness within.
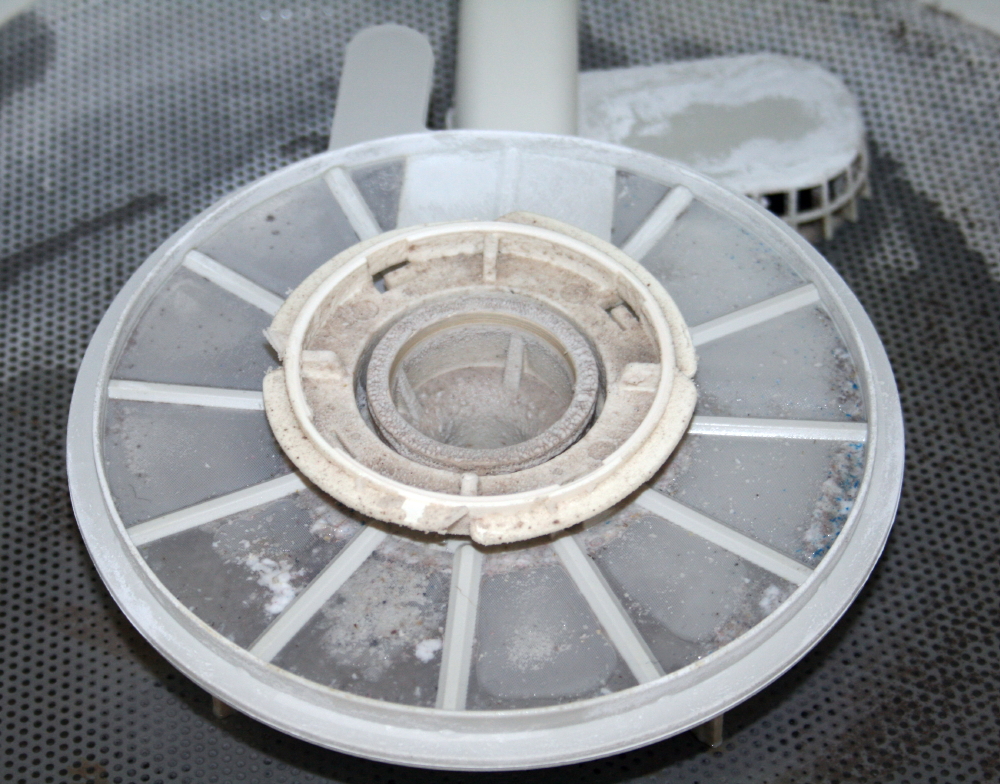
Hub nut cover, top and bottom. As seems to be required, covered with weird gray fuzz, which is getting thicker...


By now I am POSITIVE that the previous homeowners never once took this machine apart to clean it properly.
Time to remove the first filter! First look at the hub, and isn't IT pretty! Gray chunky has given way to a layer of gray...skin. Charming.

The underside of the non-cleanable filter is everything I expected it to be.
The gunk...the gunk is SO VERY THICK. The gunk has thickness. Actual heft and weight. The toothbrush I armed myself with to clean the dishwasher with, is inadequate. I need a bigger scrub brush.

The hub nut. I'm not sure what level of Dante's Dishwasher Inferno we are at here, but let me just say whimper...
I DON'T WANNA DO THIS ANY MORE.
 I keep rewatching the how-to video, hoping I'm nearing the end. No such luck.

The gray gunk as achieved sliminess now, as well...and the smell...OH GOD, THE SMELL.

The hub nut is removed...
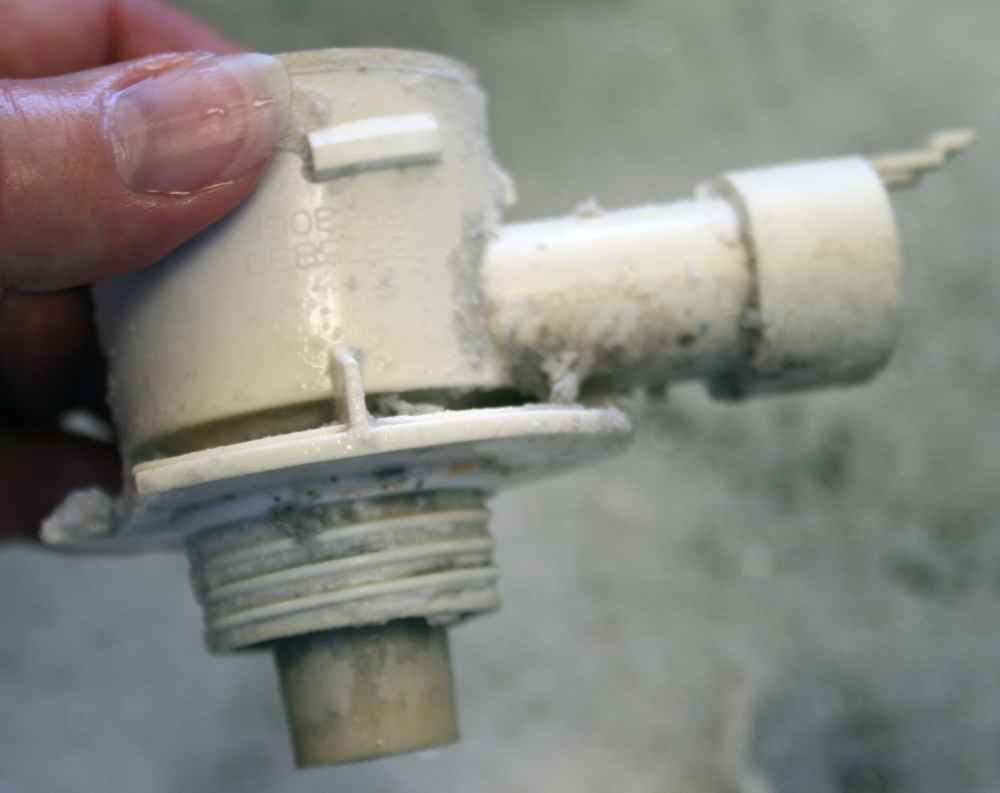
The underside...

Wait...what IS that in the center...?!

Dunno, but it's metal. Appears to be some kind of worn-through washer of some sort. Is it important? WHO KNOWS, WHEE!

But now I can see into the depths of the next Ring of Hell. That rectangular sump cover is next. Oh God now I have to remove something called a 'sump cover'. THAT MEANS THAT WHAT LIES BENEATH CAN ONLY BE A SUMP. *more pathetic whimpering*

As a little aside: just a little shout-out and a kick in the nuts to the person who designed this thing. When you are short, reaching the back of things is a real challenge...
This means that when you have to remove a screw from the BACK of the machine you must fully commit and stick the entire upper half of your body into an ancient, grody dishwasher. I experience similar joy when cleaning my oven.

Sump cover off...
ARE YOU FUCKING KIDDING ME.

Even though I thought I was ready to see what was under it...I was wrong. Also, my hands aren't strong enough to get the nasty sump basket out, even with muttering 'Fuck it!' and attacking the thing with heavy tools and fed-up determination. Husband is at work, daughter is asleep. Whoever sticks their nose in the kitchen next loses, and gets to horse that thing out.

I think there may well be something alive lurking down there, like the garbage-masher monster in the original Star Wars movie.

Husband lost, he appeared first. Probably a good thing, since it took all his strength to get that sump basket out...and that man could crack coconuts with his hands.

Just for the sake of reference, this is what the sump basket is supposed to look like. See all the little drain holes?

NOW YOU SEE THEM, NOW YOU DON'T.

My camera refused to focus on the interior of the basket, I figure out of sheer disgust. I don't blame it at all. Let's just say there was at LEAST an inch of gunk down there.


The gunk is well on its way to fossilization.

ARE YOU FUCKING KIDDING ME, V2.0.
The round part is supposed to be a drain that is NOT halfway blocked with gunk. I think we may have found the problem!

Because no quest is complete without the final Big Boss battle, it is now time to remove the metal screen on the bottom of the machine.

...and then I get to go spelunking down there, sticking my finger in to check and make sure the flapper valve is working. And unhappily, that is the ONLY way to check it, I'VE GOT TO STICK MY FINGER DOWN THERE.

I remove the big metal screen and flip it over...
...and I am all out of $2 cuss words for the previous homeowners at this point and have to repeat myself. I heap imprecations on their offspring, neighbors, co-workers and pets as well while I'm at it.
  
THE BIG SCREEN IN THE BOTTOM OF THE MACHINE HAS GUNK STALACTITES ON THE BOTTOM OF IT.

This thing is supposed to be flat.

Seriously, who shoots themselves in the foot and does this to their own major appliance?!

But all the fun cannot be had just here, and distracting myself isn't going to get that damned sump cleaned out. I have disgusting, stinky, standing water to bail, after all.

Water removed, with the aid of a rag and flowery, exotic, elaborate cussing.
Even after scooping out several inches of gray gunk from The Pit of Despair, I cannot see the bottom of the sump. Gonna close my eyes and think happy thoughts when I go exploring in there.


Welp, the sump and little flapper valve that was the finish to this disgusting quest was every bit as foul as could be hoped. Enough nightmare fodder to last several weeks.

But--hallelujah, brothers, the flapper valve is working! What's more, I FOUND an evil object stuck in the valve and holding it open, causing the problem--surprisingly, it was NOT the 30+ years of gunk, it was this:

A wooden toothpick, snarled up with a twist-tie. I held it up in one triumphant fist ala Lion King, shook it at the sky, and roared 'AH-HA!'

I hope I never have to do anything like this again. Seems I keep saying that, in this house...and I have no doubt that I will, at some point.

Thursday, December 28, 2017

Happy Anniversary, Time For Cussing!

After nearly 5 years in the house...got to do some quality cussing at the previous homeowners again today, yay!

The dishwasher, built in 1983 and here when we moved in, has been doing a lackluster job lately, and running vinegar through it and attacking it with a toothbrush and cleaning supplies didn't help this time.

Like, at all.

Going spelunking into the depths of the thing armed with a mirror and flashlight, I discovered that the three spray arms were looking gunky...like seriously gunky.

Like, 34 years worth of gunky. Terrific, previous owners never cleaned them.  I warm up my favorite cuss words.

So, away to the Internet I fly, to find the tech manual for my ol' GE dishwasher, because what I don't want to do is break off some 34 year old, impossible to find, no-doubt-brittle-as-an-old-ladies-bones vital plastic piece that holds the thing together.  The owner's manual, as typical for major appliances and cars, is useless when it comes to this stuff--it's gotta be the tech manual.

Success, I find it!
Uh huh.  As I suspect, the two end caps on the drawer slide that stop the upper rack from being yanked out of the thing require a specific way of removal, and are fussy and easily broken when new--never mind their dubious condition after 34 years.

When I return to the kitchen to inspect mine, to my delight and complete lack of surprise the fussy tabs have been already broken and just crammed back into position by previous owners, whee! Just getting started and this project is already fun! I get that familiar sinking feeling when dealing with anything the previous owners of this place inflicted on this poor house.

I read through the tech manual and further find that the upper rack MUST come out in order for me to be able to clean the middle spray arm as thoroughly as it needs.  What the hell, the end caps are already broken, so after carefully attacking the things with a screwdriver and some choice swear words they come out, huzzah.

At this point I decide to be smart, quit while I'm ahead and not take the spray arm off the rack--every single inch of plastic inside this ancient dishwasher is brittle and begging to break if I look at it wrong, and won't take the amount of enthusiastic twisting and pulling that removing the spray arm demands. I take the upper rack out and one of the wheels falls off--intact thank God, but the post it mounts to is pretty sad looking and shedding bits of plastic. Into the kitchen sink the upper rack goes, spray arm and all.

Armed with a mirror and flashlight, I inspect the spray arm, which hasn't been spraying lately...

And Jesus take the wheel, the thing is horrifically disgusting--caked with 34 years worth of calcified, fossilized crap that seems to be mostly hardened detergent and calcium deposits.  What follows is a solid hour of scraping, chiseling gunk out of the holes in the spray arm, rinsing it out, having it vomit up more hardened crap, prying & picking it out, rinse...repeat...

This nonsense goes on for quite some time. Eventually I find an actual small chunk of broken glass, which I think started it all way back whenever by causing a blockage that the fossilized crap cheerfully built on, and manage to pry it out of the spray arm's innards.  This is where I really break out the $2 cuss words and verbally cast doubt on the previous owner's parentage. Finally--joy, the thing allows water to run through it again!

One down, two more to go.

Both of those two require serious acrobatics to clean, haha. The top arm can safely be removed, thank heavens, with the aid of the mirror and flashlight combo again and only minor contortions, and is degunked in the sink after many minutes of chiseling/prying deposits out.  The bottom spray arms decides to be the fly in the ointment and resists all attempts at removal.  I'm loath to break the thing and turn this project into even more of a circus, so I leave it where it sits and instead take a deep breath and dive it to clean it in place.

After all this comes the easy part--basic dishwasher scrubdown and cleaning, which I've been doing all along since we moved in, so at least that part goes quickly. To my relief the fussy tabs meekly go back into position and hold in place with only minimal growling on my part but maximum 'Screw-you-just-get-IN-there' determination.

Now to push the button and run the thing on a rinse cycle so see how it fares...

And to wait for the other shoe to drop tomorrow when I'm wondering why all my muscles are so weirdly sore.


Tuesday, November 11, 2014

Fun With Home Improvement!

So today we decided to change out the existing aggressively 70's Holy God UGLY light fixtures that came with the house.

There were three, one large one (admittedly more 80's than 70's, someone had at least made an attempt) over the foyer...

...and two anemic hallway fixtures, identical to one another.


And yes, in keeping with what we found in the rest of the house, we were not a BIT surprised to see that all had paint slopped on them.

Well...maybe the hallway ones weren't as ugly when turned on and weren't really that ba--
Nope.  Never mind.  Turning them on only allows you to see that the previous folks had, in the spirit of equality, also slopped paint on the glass shade.

Soon the hallway lights were taken down and changed out to matching fixtures made in this century!
Yay!

Now for the big one over the entryway, which needless to say, looks as if it was painted into place.

My husband calls me. "Hey, come get a load of this!"
I involuntarily whimper and go to see, dragging my feet a bit since calling each other over to glimpse the latest horror unearthed in any household project has become a morbid game of one-upmanship.
Hang on a tick, what's with the base of the thing, on the ceiling?  What IS that peeking out?
"What IS it?"  I whine.  It has corners. 
He doesn't know, but soon all is revealed.

Ah, a craptacular, half-assed ceiling patch!  Naturally!

The real kicker is that you can see that this fixture was actually the THIRD one the house has had here, if the initial hole the patch is covering was the first--the small circular mark betrays all.  You can see the larger round mark where the current fixture was.  Lovely. I especially like the fact that while the smaller fixture was up, the big ugly square patch was visible in all it's glory.  Classy.

Bracing for the worst, we remove the square patch to see what new delights await us.
Hey, we're finally down to the original ceiling fixture!  Despite that this is inside the house, they used a cheap exterior fixture.  And ain't it attractive! And of course, of course they hadn't masked the thing off when they sprayed new acoustical goop on the ceiling, they just coated the entire fixture with it. I was not at all surprised to see that the original ceiling sported typical 70's metallic gold flecks on it.

Dear God in Heaven.  I'm starting to wonder if my house was a prison in it's previous life.

The wiring is checked and secured to make sure it isn't going to burn down the house some night while we sleep.  Unfortunately, the ridiculous square ceiling patch is needed to cover the hole, so back up it goes, but not before my husband writes an explanatory note of apology to future homeowners, denying responsibility for the thing.  At least this time it will be covered and won't be peeking out like clockspider.

New fixture covers the prior ugliness, costs more than 2 1/2 cents and matches the decor, yay!

I count today as a little victory in the war against 40 years of previous tenants' jihad against this poor house, a small but helpful step.

The bullet holes in the garage wall on the deck out back are for another day, I still need to do some research on how to patch those.

Monday, May 26, 2014

More Home Improvement...

More progress towards making the house a bit less of an eyesore, this is just the warm up for the REALLY big projects coming up in June and July--first we're having the old juniper stumps removed, the overhanging trees trimmed, the back part of the property drug, all the debri removed and some planting holes for trees & shrubs dug--I'm DONE trying to dig holes in this ground without the aid of major machinery.  Once the holes are dug we can plant the trees and bushes...

Then in mid-July will come the VERY long awaited chain link fencing!  I'm so excited for that I can hardly stand it, because it means that after more than two years, the chickens will finally get to roam the yard safely.

Meanwhile, smaller projects are getting done.  The other day we got a new mailbox but hadn't put it up yet...the old one then suddenly just fell over, pole and all, in apparent despair.  Mailbox suicide. It's zip-tied in place for now lookin' all classy 'n stuff until the hole for the new mailbox pole gets dug.

Today was new front porch lights!  Because the old ones were cheap, ugly, too small and looked like they wanted to burn the house down.  Before:

Yeeeaah....aggressively ugly.  My favorite part is the ghostly outline of the previous porch lights.

New ones!  Much more attractive and the right freakin' size.

Yay.  The weird wood strip above the door is getting replaced with a painted bit of trim that will match the rest of the doorway, then the front entrance should look a bit more inviting and cease resembling the local haunted house.  We also managed to get a monster flag holder to bolt to the house, we planned pretty carefully for the wind in locating it, making sure it's mounted securely to a corner.  Hopefully we won't be buying a new flag once a week...

Sunday, August 4, 2013

Miss Underfoot Is Watching!

ALL PROJECTS MUST, BY LAW, BE UNDER DIRECT CHICKEN SUPERVISION AT ALL TIMES.


Sugar made sure that my husband was installing the new screen door correctly, stood on the drill, got lost behind the new door and had to be rescued, then nibbled some grass and went off to sunbathe.